
Docker represents a robust platform specifically engineered for deploying and executing applications within isolated environments known as containers. This innovative technology empowers users to seamlessly deploy a wide array of software, including popular tools like Redis or MongoDB. Furthermore, it facilitates the use of particular software versions that might otherwise lack native support on your operating system or demand intricate compilation procedures, streamlining the development and deployment workflow.
The platform seamlessly integrates containerization technology as an extension, offering a powerful solution for the streamlined management and operation of containers. This integration allows users to harness diverse container images to run applications with exceptional efficiency, whether these applications reside on your local host server or are distributed across remote container environments.
This comprehensive guide aims to provide a clear and detailed walkthrough of the fundamental processes involved in creating, configuring, and efficiently managing containers directly within the hosting control panel\'s interface. Beyond local management, you will also discover how to extend your control to remote container hosts from your administration panel, significantly expanding your deployment and operational capabilities.
Important Security Notice: The container management extension directly retrieves images from public registries without any inherent pre-configuration. It is crucial for users to understand that certain containers and the software they encapsulate are designed primarily for trusted environments and may, therefore, necessitate the implementation of additional security protocols. Before deploying any downloaded images, users are responsible for implementing robust security enhancements. Always refer to the comprehensive documentation provided by the container or software vendor for specific security guidelines. For example, consult the security section in the Redis documentation for detailed recommendations.
For optimal operation, containerization is officially supported for the following operating systems:
Please note that for installations on Windows, the container service must be established on a remote machine. Further details are available in the "Using Remote Docker" section of this guide.
Before you can fully leverage containerization within your environment, the crucial container management extension must be installed on your server. Follow the pertinent instructions based on your role:
Once the extension has been successfully installed, you will be fully prepared to utilize the capabilities of container technology. The "Docker" option will then become readily visible and accessible within the Navigation Pane of your administration panel, signaling that the service is operational and ready for use.
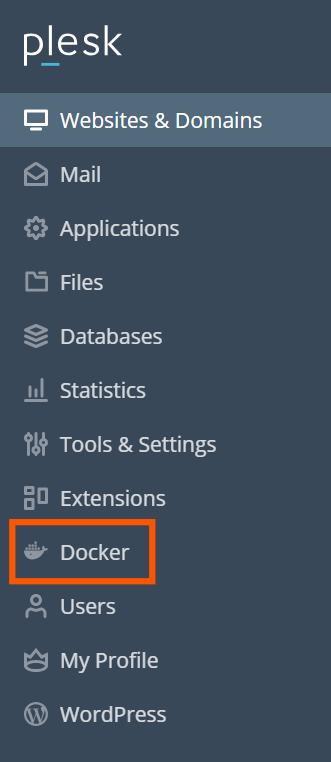
Within the administration interface, users can conveniently access an extensive collection of images from public registries through the "Run Container" catalog. To initiate this process, navigate to Docker > Containers > Run Container.
To open the catalog and explore the available images:
 in Docker > Containers.
An intuitive search box allows you to easily locate specific images. You can perform searches by image name, repository, or a combination of both criteria.
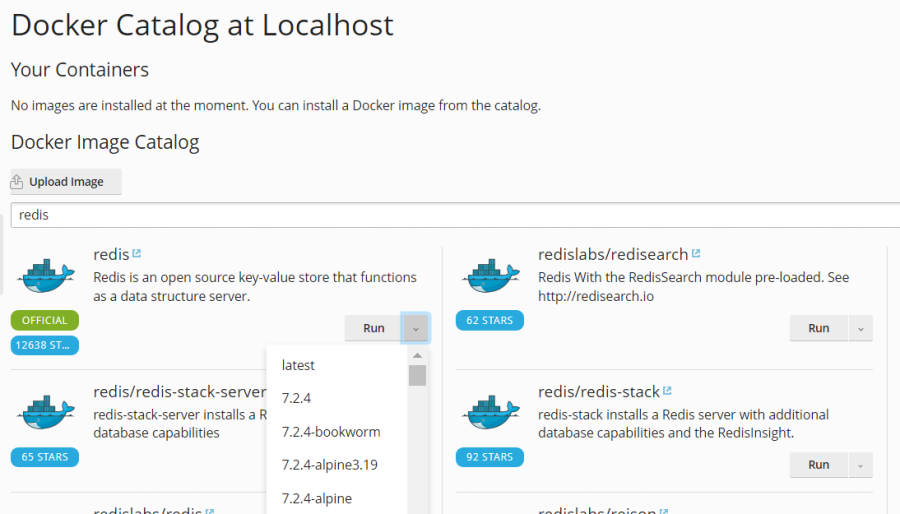
The powerful search functionality encompasses two primary repository types:
Many applications offer various versions to accommodate different requirements. You have the flexibility to deploy a specific version by selecting the appropriate tag from the available options, as illustrated below:
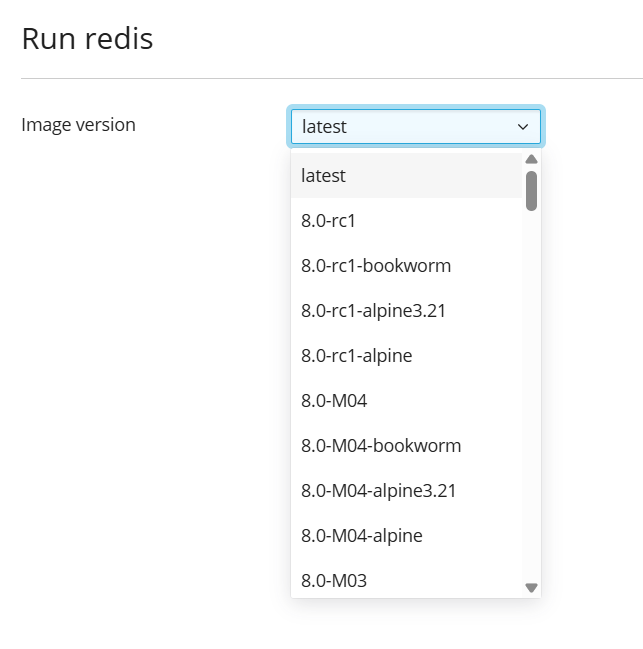
Follow these precise steps to launch a new container:
 to access its description and associated documentation directly within the registry. This option is not applicable to locally stored images.
The platform will then initiate the container creation process, guiding you to configure its settings, including essential environment variables. You retain the option to halt this process at any point by clicking Cancel on the Settings screen. Detailed information regarding these configuration parameters can be found in the "Configuring Container Settings" section later in this document.
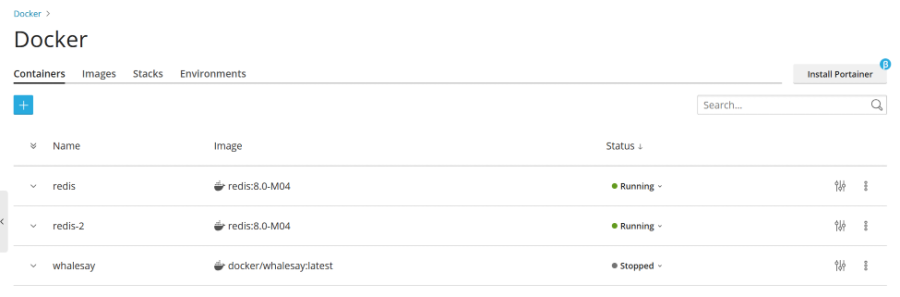
It is always advisable to review the Console Log to confirm that the container is operating without any unforeseen issues or errors immediately after deployment, ensuring smooth functionality.
Note: It is not necessary to halt a container to modify its settings. When new configurations are saved, the system intelligently recreates the container to apply your changes, ensuring minimal downtime.
To access and adjust container settings, navigate to the Containers tab and click the settings icon  situated adjacent to the container you wish to configure.
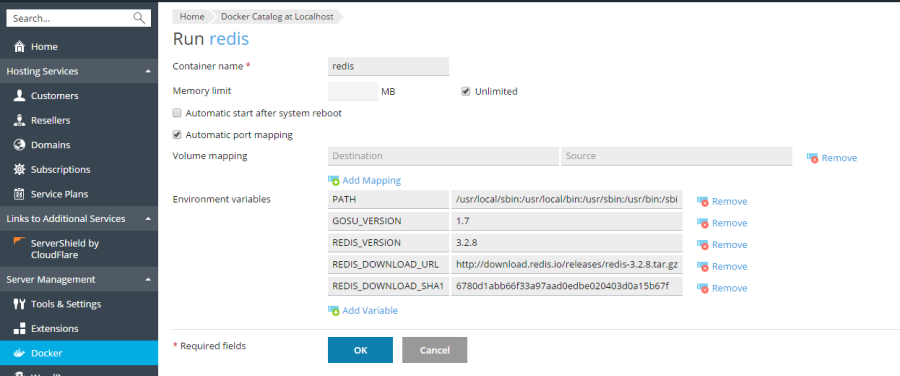
By default, containers operate with unfettered access to the host system\'s RAM. To establish a specific limit on memory consumption, simply select the Memory limit checkbox and specify the desired maximum value in megabytes within the corresponding MB field. This allows for precise resource allocation and helps prevent a single container from monopolizing system resources.
Important: At present, direct limitation of CPU or disk usage for containers is not available within the hosting control panel interface.
Note: Containers are classified as administrator-level objects and are therefore not bound by subscription-level cgroup limits, which typically regulate CPU, RAM, and disk usage for individual user subscriptions. This provides greater flexibility for advanced deployments.
For ensuring uninterrupted service availability, it is highly recommended to activate the Automatic start after system reboot option. If this crucial option is not selected, any websites or applications dependent on this container may become inaccessible following a system reboot, necessitating manual intervention to restart the container and restore functionality. Enabling this feature ensures resilience and continuous operation.
By default, Automatic port mapping is enabled. This feature automatically assigns a random, available port on the host system (e.g., 32768) to the container’s internal port. This simplifies initial deployment by removing the need for manual port selection.
To gain precise control and customize the host system port, simply deselect Automatic port mapping and enter your preferred external port number in the Manual mapping field. If the Manual mapping option does not appear after deselection, it indicates that the container is not configured to expose any ports externally.
When employing manual mapping, containers, by default, bind the specified port exclusively to the localhost interface (127.0.0.1) of the host system. This configuration is a security best practice, ensuring that the port remains inaccessible from the internet and thereby enhancing the security posture of the application running within the container. Should there be a requirement for the container service to bind the specified port to all network interfaces of the host system, you can deselect the Make the port inaccessible from the Internet option. It is imperative to understand that this action will make the application inside the container reachable from the internet via any of the host system\'s IP addresses on the designated port, requiring careful consideration of security implications.
Security Warning: Container technologies generally operate under the assumption that applications are equipped to handle their own authentication mechanisms. However, this is not universally true (e.g., MySQL/MariaDB typically requires authentication by default, whereas Redis may not). Exposing an application running inside a container directly to the internet without robust authentication and comprehensive security configurations significantly escalates its vulnerability to potential malicious attacks. Users are advised to exercise extreme caution and implement stringent security measures to protect exposed applications.
Container volumes are essential directories on your server that are mounted directly into a running container. This critical feature delivers persistent storage, guaranteeing that data can be reliably accessed and preserved independently of the container\'s lifecycle. Significantly, any data stored within these volumes remains intact even if a container is stopped, removed, or recreated, making them ideal for databases and user-generated content.
Data Backup Warning: It is crucial to note that data residing in container volumes is explicitly excluded from standard backup procedures. To effectively mitigate the risk of potential data loss, it is highly recommended to implement a robust, third-party backup solution specifically for any critical data stored within these volumes.
For a more profound understanding of data management within containerized environments, users are encouraged to consult the official documentation regarding container storage volumes.
To establish a new volume mapping, you must specify two absolute paths:
Should the need arise to map additional directories, simply click the Add one more button to expand your configuration options.
Environment variables are instrumental in customizing and configuring applications that operate within a container. Users may find it necessary to introduce new variables or modify existing ones to precisely tailor the application\'s behavior to specific operational requirements. The platform offers the flexibility to add an unlimited number of environment variables as dictated by your application\'s needs, providing extensive customization capabilities.
The platform provides a comprehensive suite of operations for effectively managing your containers:
Important Note: If you have not diligently saved your application data to mounted volumes (as thoroughly explained in the "Volume Mapping" section), any unsaved data will regrettably be lost during the container recreation process. Consistent use of volumes is critical for data persistence.
To diligently monitor container activity, simply click the arrow icon  adjacent to a container. This action provides access to its logs and allows you to observe real-time resource consumption. To modify container settings, click the settings icon next to the specific container you intend to adjust. This interface allows you to fine-tune parameters such as environment variables and volume mappings. To rename a container for better organization, navigate to its settings and simply modify the Container name field.
Further advanced actions can be accessed by clicking the more options icon  next to a container, which reveals a contextual menu:
The recreation of a container is a common procedure, typically executed when there is a need to update the embedded application to a newer, more feature-rich, or more secure version. However, it is important to emphasize that users possess the flexibility to rebuild a container using any available application version from the catalog, not exclusively newer iterations. This provides significant version control.
Crucially, during the recreation process, all custom settings and configurations you have meticulously applied to the container will be faithfully preserved. To guarantee the uninterrupted continuity of data actively utilized by the application within the container, it is absolutely essential to configure volume mapping prior to initiating any recreation. Volume mapping serves to facilitate robust access to directories utilized inside a container, thereby providing persistent and reliable data storage, as elaborated in comprehensive detail within the "Volume Mapping" section of container settings.
To effectively recreate a container, adhere to these steps:
situated next to the container you wish to recreate.While the platform typically defaults to utilizing a locally installed container service, it also robustly supports the integration and comprehensive management of container services deployed on external, remote hosts. It is crucial to bear in mind that only one container service (be it local or remote) can be actively operational within the control panel at any given time. The currently active server is always clearly designated within the Environments tab of the container settings page, providing immediate status.
Important Note: Accessing and fully managing remote container services necessitates a specific license key add-on. Without this crucial add-on, your operational capabilities will be restricted to controlling solely the local container service running directly on your server, limiting extended deployment scenarios.
To successfully integrate a remote server hosting container technology with your control panel, it is a prerequisite to first meticulously configure the remote server itself. This essential configuration involves establishing secure communication protocols using TLS. Detailed and comprehensive instructions for this setup process can be found within the official documentation for securing the container daemon with HTTPS.
The platform is designed to facilitate the establishment of secure connections between your server (equipped with the container extension) and a remote node running the container service. The following detailed, step-by-step instructions are applicable for installations on both Linux and Windows operating systems.
/etc/docker/daemon.json configuration file on your remote server with the following content. This meticulously configures the container engine to listen for remote connections over TCP with TLS encryption robustly enabled.
{
  "hosts": ["tcp://0.0.0.0:2376", "unix:///var/run/docker.sock"],
  "tls": true,
  "tlsverify": true,
  "tlscacert": "/root/ca.pem",
  "tlscert": "/root/server-cert.pem",
  "tlskey": "/root/server-key.pem"
}
openssl genrsa -aes256 -out ca-key.pem 4096
openssl req -new -x509 -days 365 -key ca-key.pem -sha256 -out ca.pem
openssl genrsa -out server-key.pem 4096
openssl req -subj "/CN=192.0.2.1" -new -key server-key.pem -out server.csr
openssl x509 -req -days 365 -sha256 -in server.csr -CA ca.pem -CAkey ca-key.pem -CAcreateserial -out server-cert.pem
openssl genrsa -out key.pem 4096
openssl req -subj '/CN=client' -new -key key.pem -out client.csr
openssl x509 -req -days 365 -sha256 -in client.csr -CA ca.pem -CAkey ca-key.pem -CAcreateserial -out cert.pem
chmod 0400 ca-key.pem server-key.pem key.pem
chmod 0444 ca.pem server-cert.pem cert.pem
cp /lib/systemd/system/docker.service /etc/systemd/system/
sed -i 's/\ -H\ fd:\/\///g' /etc/systemd/system/docker.service
systemctl daemon-reload
systemctl restart docker
.pem files are absolutely essential for your client to establish a secure and robust remote connection to the container service.
cat key.pem
cat cert.pem
cat ca.pem
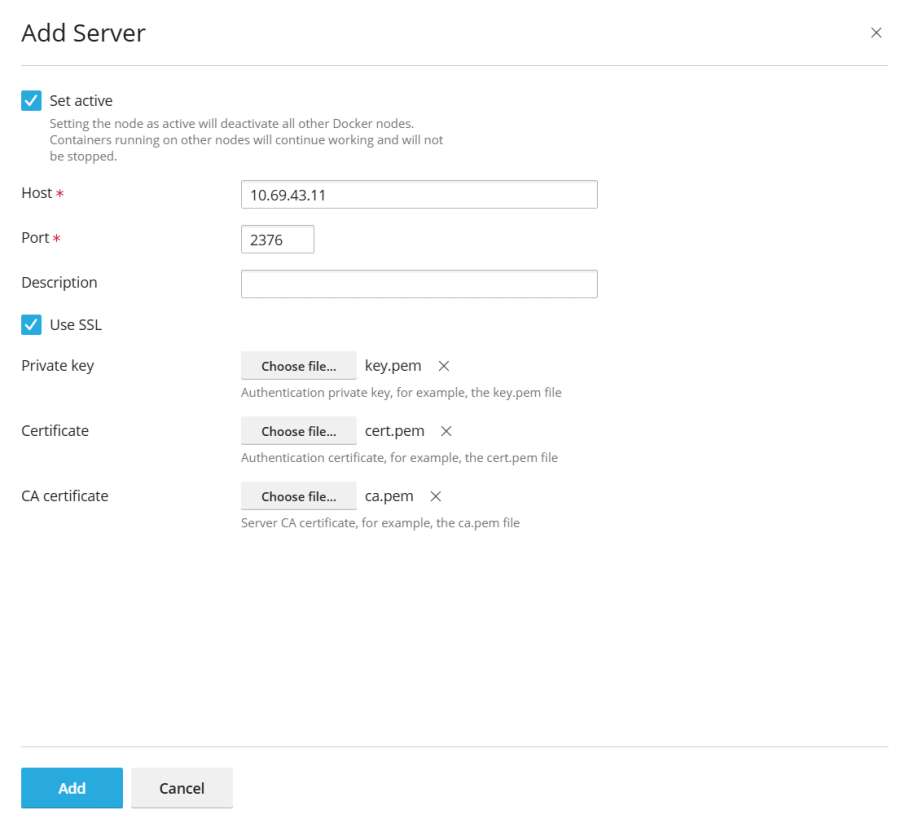
Once successfully configured, the link to the container service will become prominently visible and readily accessible within the Navigation Pane, indicating its readiness for use.
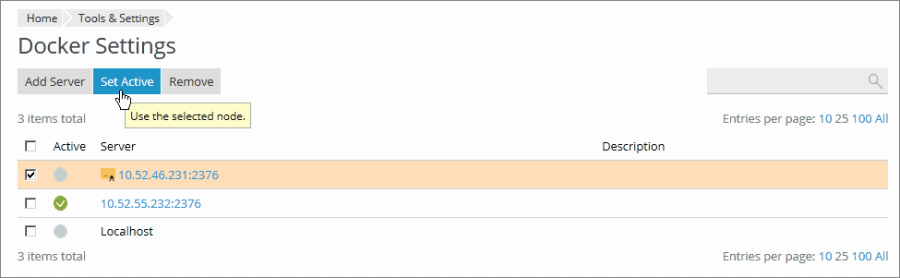
To effortlessly switch between different container services (whether local or remote):
Alternatively, you have the option to mark a container node as active directly while you are in the process of editing its settings, streamlining the workflow.
Should you desire to capture and meticulously save the modifications you have applied to a running container as a new, reusable image, the platform offers the highly convenient Save as Image command. This powerful action effectively generates a precise snapshot of your container\'s current operational state, which includes all custom configurations, and subsequently registers it as a brand-new image within your personal image catalog. This process proves invaluable for developing custom images that are pre-configured with specific settings, such as uniquely tailored environment variables, significantly streamlining future deployments and ensuring consistency.
To create a new image from an existing container, follow these clear steps:
located next to the container from which you intend to create an image.Once successfully created, this new image will become visible within the Images tab, distinctly marked as a Local image, signifying its availability on your server.
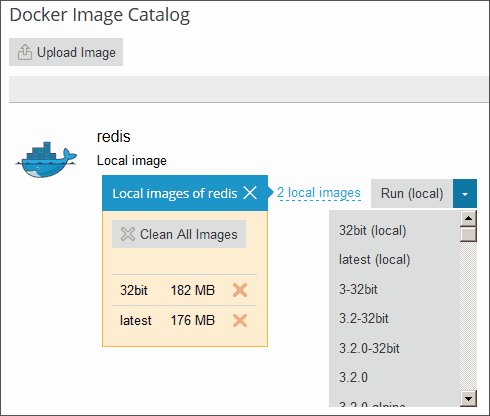
Local container images are those that have been successfully downloaded and are stored directly on your server\'s local disk. This efficient storage mechanism completely obviates the necessity to re-download them from the online Image Catalog for subsequent deployments, thereby significantly accelerating and optimizing deployment processes. Having local images readily available contributes to faster instantiation of containers and reduced reliance on external network access.
An image typically transitions into a local image under several distinct circumstances:
To download an alternative version of an image from the online catalog, simply click the Pull icon  . Then, from the intuitive drop-down menu, select your desired version and click Pull to initiate the download.
If at least one version of an image group has been downloaded, that image will be clearly labeled as a Local image within the catalog interface. The system also conveniently displays the total number of local images that are currently available for a specific product, providing a quick overview of your stored assets.

To efficiently manage and effectively remove outdated or no longer needed local images, follow these steps:
Many containerized applications are inherently designed to expose specific network ports, thereby allowing the applications running within them to be directly accessible. However, when seamlessly integrating such an application with your primary website, requiring end-users to explicitly specify a non-standard port in the URL can prove to be both inconvenient and detrimental to user experience. This can lead to complex URLs and a less professional presentation.
To elegantly circumvent this usability challenge, you can strategically configure Nginx to operate as a robust reverse proxy. In this setup, Nginx efficiently forwards incoming requests from your domains directly to the container\'s designated port. This intelligent configuration empowers your domains to confidently utilize standard web ports (such as 80 for HTTP or 443 for HTTPS), completely eliminating the necessity for explicit port specification within URLs and ensuring a clean, user-friendly address.
adjacent to the specific container you intend to configure.Once the container port has been meticulously mapped manually, you are prepared to proceed with setting up Nginx to proxy requests. This pivotal step involves the precise addition of a proxy rule directly within your domain\'s settings.
Follow these structured steps to effectively establish a new proxy rule:
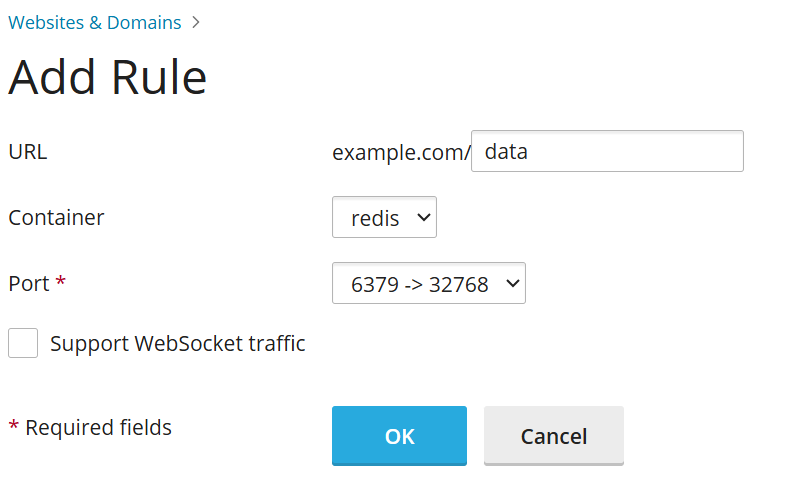
These sophisticated proxy rules are seamlessly and intelligently integrated into your web server\'s configuration, typically residing within the website’s nginx.conf file (usually located in /var/www/vhosts/system/$domain/conf/). An illustrative example of the automatically generated configuration block is presented below:
#extension docker begin
location ~ ^/.* {
    proxy_pass http://0.0.0.0:9080;
    proxy_set_header Host             $host;
    proxy_set_header X-Real-IP        $remote_addr;
    proxy_set_header X-Forwarded-For  $proxy_add_x_forwarded_for;
}
#extension docker end
It is important to emphatically state that these proxy rules are meticulously engineered to function flawlessly even on servers that are operating behind a Network Address Translation (NAT) setup, ensuring broad compatibility and robust performance.
Note on Disk Space Usage: Container deployments linked through Proxy Rules to a website typically do not contribute to the subscription’s reported disk space usage. However, a significant exception arises if a website directory is directly mounted into a container as a volume; in such specific scenarios, all files residing within that volume *will* be counted towards the website\'s allocated disk space, requiring careful planning for storage.
The platform significantly simplifies the deployment of complex, multi-container applications by fully supporting Docker Compose YAML files. Users are presented with several convenient and flexible options for deployment: utilizing an integrated online text editor, uploading a file directly from local storage, or selecting an existing Docker Compose file that is already present within a website’s Home directory. This flexibility caters to various deployment workflows and preferences.
Upon successful deployment, the system natively supports all typical Docker Compose operations on these application stacks. These operations include up (a command that intelligently encompasses both pull to retrieve images and force-recreate to ensure a fresh deployment), stop to gracefully halt services, and down to completely remove the stack. This comprehensive support allows for full lifecycle management, empowering users to seamlessly modify, update, and maintain their deployed application stacks as required, long after their initial creation. This capability is essential for agile development and continuous integration.
Important Note: This specific section is dedicated exclusively to Docker Compose YAML files. It does not extend support to the deployment of Dockerfiles or any other supplementary files that may be required by an application beyond the Compose definition itself.
Furthermore, the platform empowers users to declare and meticulously build custom containers as an integral part of their Docker Compose setup. Any artifacts, such as images or built components, that are generated during this build process will be conveniently and automatically stored within the website’s Home directory, maintaining organizational structure.
For an exhaustive understanding of the Docker Compose file format and its extensive capabilities, users are strongly encouraged to consult the official documentation, which provides in-depth technical specifications and usage examples.
Portainer stands as an intuitive and remarkably powerful container management software, meticulously engineered to simplify the deployment of both individual containers and intricate application stacks. It delivers a highly user-friendly interface that offers comprehensive functionalities, including real-time monitoring of container status and logs, the efficient establishment of user accounts and teams, robust mechanisms for securing your container environments, and a wealth of other essential management features.
To install Portainer within your container environment, navigate to Docker > Install Portainer. Once the installation process has been successfully completed, you can conveniently access and manage your Portainer instances by navigating to Docker > Go to Portainer, providing immediate access to its powerful dashboard.
Please Note: At this present time, Portainer integration within the platform is designated as a beta feature, indicating ongoing development and refinement.
For comprehensive detailed information and advanced utilization strategies for Portainer, users are strongly advised to consult the official Portainer documentation, which offers in-depth guides and technical insights.